Pregnancy Mandala

Several years ago, I (also) taught yoga to pregnant women. As an extra, there was the possibility of making a pregnancy mandala. How you can make one of these mandalas is explained in this article, and several of the mandalas that were made then are also shown.
Pregnancy Mandala
You make a pregnancy mandala for your child, so he or she can look back later
on the time before his or her birth; a time that is easily forgotten, but is
also important in view of human development.
Mandalas are circular figures in which something is represented, sometimes symbolically,
sometimes intuitively, about the inner experience of people. They can be found
in many different shapes and colours and are made in several cultures, by one
or multiple people. [More about mandalas on
Mandalaproject.org]
In the past, I drew many mandalas myself and taught yoga to pregnant women.
In this period of my life, the idea arose to design a pregnancy mandala. The
design had to come from the idea of a framework, the meaning of which is known
only to insiders. This is how it’s done in Buddhist mandalas. This way,
a mandala can only be ‘read’ by those who know about it. And the
idea of the famous psychiatrist Jung, that a conception can only be achieved
when the four elements ‘father, mother, heaven and earth,’ are present,
also had to be used in it.
The women who make the mandala, use it to represent their pregnancy up to the birth of their child. It is fun to work on it and it helps the women to experience their pregnancy more consciously. This was the underlying intention of the design: by representing your own feelings, you experience them more intensely and more consciously.
By drawing a mandala about her pregnancy, the mother-to-be will be stimulated,
without being forced, to pay conscious attention to the thing that is so important:
within her, new life is growing, and everything that is developing needs the
proper energy to achieve optimal growth. This can be achieved through loving
attention. Therefore, it is important that you work on your mandala seriously
and with pleasure. Only then will you create something of value for yourself
and your baby. And if the result is not that great, so what? You can always
start again. You can find nice pictures in books and magazines and you can ask
for advice from people who know more about colours and drawing than you.
However, the drawing is done by yourself as a mother-to-be.
Drawing in a small group is a relaxing and fun activity in which you can be
openly and freely intimate with each other.
How do you make a pregnancy mandala?
You can make a pregnancy mandala by drawing, painting, sculpting or whatever you want. Below, you will find an explanation of the technique according to my design. Once you understand the principle, you can choose the materials you want to work with. The process you are working on is the most important thing. It forces you to think about conception, pregnancy, birth and your role in this as a parent. In principle, you start the mandala during the pregnancy, but you can also start later.
In case of adoption, you can also make a mandala. This has to be done in a slightly different way, because you cannot represent the period before the birth. The mandalas "Badra" and "Anthon" show how an adoption-mother created beautiful adoption-mandalas when her children were already adults.
The technique below is a guideline. If it feels better to deviate from it, you definitely should. The mandala "Iris" is an example of this.
Technique.
Materials: drawing paper of good quality (A3 size), a compass, ruler, soft pencil (f.e. 2B), thinliner, eraser, soft colour pencils.
Design/plan:
You start by deciding the centre of the paper, which is also the centre of your
mandala. Then you draw the frame of the mandala, starting with a dot in the
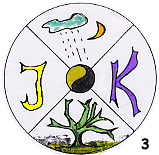
middle (see example 1, which is a design in its early stage) or a small circle
and around it a circle of approximately 3,5 cm. (see example 3). You carry on
by drawing 9 circles around it, with a distance of 8 / 9 mm. between them, in
which something will be written about the nine months. You are completely free
in the measurements, but practice has shown that these produce a nice, harmonious
result.
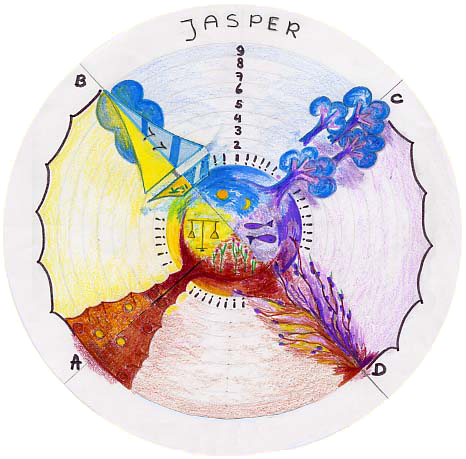
When making a mandala, you always work from the inside out, because
the process is from the inside to the outside. So in the centre you draw the
conception. Suggestions: a yin-yang sign (example 3), an embryo (can be copied
from a book), spiral-shapes, sperm and egg cells…
Outside of the ninth circle you have to leave enough space to picture the birth
and the information about the birth (name, place, time, weight, sign…).
If you want to pay extra attention to the birth, reduce the distance between
the nine circles. If you think a small line is enough for the birth, you can
increase the distance between the circles.
It is recommended to create a draft first, to get a better view of the division
of the circle: write down your ideas with a soft pencil so they can easily be
erased. (It rarely happens that someone gets everything right the first time).
It is important that the mandala is entirely balanced: left and right and top
and bottom have to be in harmony with each other.
The mandala is quartered by lines A, B, C, and D. (do not let
them cross the conception circle and the birth line).
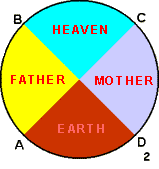
The quartering within the circle of 3,5 cm has the following meaning: the top box represents ‘heaven’, the bottom is ‘the earth’, the left is “the father”, and the right “the mother”: the four conditions for conception, see example 2.
For ‘heaven’, you use the colour of the heaven, which
means the colour that you (the person drawing) thinks represents heaven. In
example 1, the colour is blue. The ‘heaven’ is then depicted in
the top box with blue as its primary colour.
The word ‘heaven’ is heaven in the widest sense of the word. ‘Heaven’
can be anything that is literally above the earth, but can also be spiritually
interpreted. Likewise, ‘earth’ can be interpreted as everything
underneath your feet, or as a symbol for solidity, strength or trust.
In the ‘father’ box, you represent what the father-to-be sees as
the most important thing in his life during the time of the pregnancy. This
can be his occupation, a hobby, his favourite animal, or whatever. The father
chooses! Then he also chooses the colour which he prefers at that time of his
life: his favourite colour will be the primary colour of the box. The ‘mother’
box is filled in the same way… If it is difficult to find a symbol for
‘the father’ and ‘the mother’, you can draw astrological
signs, (1) or initials (3). You can work with stencil letters or design them
yourself (3).
If you depict the job for the father, then do the same for the mother.
An astrological sign for the father? Do the same for the mother.
The meaning ‘that which binds’ belongs to the part of the lines A, B, C and D that is connected to the 9 circles. They are guiding lines (see example 1) that can be erased later.
A= what connects the father to the earth?
B= what connects the father to the heaven?
C= what connects the mother to the heaven?
D= what connects the mother to the earth?
The lines are enveloped by a (fantasy)drawing, which is coloured with the adjacent
primary colours: what connects the father to the earth receives the primary
colours of both the father and the earth, what connects the mother to the heaven
gets the colours of both the mother and the heaven, etc. To give the mandala
enough expression, you can use other, corresponding colours. Sometimes, 4 colours
are chosen that do not correspond well together: don’t change them, these
are your colours! Find other corresponding colours that help create a nice unity.
Picture1 (developing mandala) shows what is explained above:
The primary colours are shown in picture 2.
The father likes sailing. A sailboat is drawn as a connection between the father
and heaven (B). The occupation of the father is land surveyor, and this created
the picture of the connection with the earth (A). The mother loves nature and
has chosen plant roots (D) for her connection with the earth, and trees (C)
for her connection with the heaven.
The pictures around A, B, C and D all cover approximately the same amount of
space.
The open spaces between the 9 circles will become a “month book”: every month, you write a sentence with the most important event of that month. The sentences can be varied with drawings if you like, for example of a flower that blooms in that month, the weather circumstances, etc. Be creative. Write in pencil first, so you can erase it later if needed, because it is quite difficult to get a sentence to fit.
After the birth, you fill in the outside, which should be in harmony with the whole and which, in your opinion, suits your baby. The mandala can now be framed for the nursery!
Tips:
| - | If you have worked with initials in the 3,5 cm. circle, it is better to use the same letters in the birth line. |
| - | Don’t use too many colours beside the four main colours, because this will create a restless effect in the mandala. |
| - | For a playful result: use several shades of the same colour for the primary colour. |
Good luck, LAMMY.
Click the links below and see how it might turn out:
| Veerle | |
| Luca | |
| Tom | |
| Iris | |
| Badra (adoption-mandala) | |
| Anthon (adoption-mandala) | |
Translation by Iris van Duren
[Iris, Thank You !]
© Lammy Reinders, Groesbeek 1999-2012.